1. Amazon GuardDuty란?
Amazon GuardDuty는 AWS 환경에서 발생하는 악의적 활동과 비정상적 행위를 자동으로 탐지하는 완전 관리형 위협 탐지 서비스입니다. 별도의 에이전트나 하드웨어 설치 없이 AWS가 이미 수집하는 로그 데이터 — CloudTrail, VPC Flow Logs, DNS Logs, EKS 감사 로그 등 — 를 AI/ML로 분석해 위협 징후를 실시간으로 찾아냅니다.
한마디로 "AWS 환경의 24×7 자동 보안 관제"입니다. 직접 SIEM을 구축하거나 로그를 수동으로 분석할 필요 없이 GuardDuty가 이상 징후를 Findings(탐지 결과)로 알려줍니다.
주요 이점
- 지속적 모니터링: 에이전트 없이 AWS 인프라 전체를 상시 감시
- AI/ML 기반 위협 탐지: 정상 행동 기준선(Baseline)과의 편차를 통해 이상 행위 자동 식별
- 빠른 대응: EventBridge + Lambda 연동으로 탐지 즉시 자동 격리·알림 가능
- 완전 관리형 확장성: 트래픽 규모에 관계없이 AWS가 인프라를 자동 확장
- 엔드 투 엔드 가시성: EC2, EKS, Lambda, S3, RDS 등 컴퓨팅 전 영역 커버
2. 탐지 범위
컴퓨팅 보호
- Malware Protection for EC2
- EKS Protection
- Runtime Monitoring
- Lambda Protection
스토리지 보호
- S3 Protection
- Malware Protection for S3
- AWS Backup 멀웨어 보호
데이터베이스 보호
- RDS Protection
- 비정상 로그인 탐지
- SQL 인젝션 패턴 감지
네트워크 분석
- VPC Flow Logs 분석
- DNS 쿼리 이상 탐지
- 알려진 C&C 서버 통신 감지
3. 실제 탐지 시나리오
| 위협 유형 | GuardDuty 탐지 방식 | Finding 예시 |
|---|---|---|
| 암호화폐 채굴 | EC2에서 알려진 채굴 풀 IP로의 네트워크 연결 감지 | CryptoCurrency:EC2/BitcoinTool.B |
| 자격증명 유출 | IAM 자격증명이 평소와 다른 지역·IP에서 사용됨 | UnauthorizedAccess:IAMUser/InstanceCredentialExfiltration |
| 랜섬웨어 / 멀웨어 | EC2 또는 S3에서 알려진 멀웨어 해시 파일 탐지 | Execution:EC2/MaliciousFile |
| 포트 스캔 | 단시간에 다수 포트로 연결 시도 패턴 감지 | Recon:EC2/PortProbeUnprotectedPort |
| S3 데이터 유출 | 비정상적으로 많은 S3 객체를 외부로 복사 | Exfiltration:S3/AnomalousBehavior |
| 컨테이너 탈출 | EKS 파드에서 호스트 네임스페이스 접근 시도 | PrivilegeEscalation:Kubernetes/PrivilegedContainer |
| 생성형 AI 위협 | Bedrock 모델 호출에서 다단계 공격 패턴 탐지 | TTPs:Runtime/SuspiciousCommand |
| 규정 준수 지원 | PCI DSS, ISMS-P 요구 위협 탐지 항목 자동 커버 | Security Hub 연동으로 준수 현황 대시보드화 |
4. Finding 심각도 체계
GuardDuty Findings는 심각도(Severity)에 따라 3단계로 분류됩니다.
| 등급 | 점수 범위 | 의미 | 권장 대응 |
|---|---|---|---|
| High | 7.0 – 8.9 | 리소스가 이미 침해됐거나 공격이 진행 중 | 즉시 격리·조사 (자동화 권장) |
| Medium | 4.0 – 6.9 | 공격 가능성이 높은 의심스러운 활동 | 24시간 이내 확인·조치 |
| Low | 1.0 – 3.9 | 잠재적 위험 활동, 정상일 가능성도 있음 | 주기적 검토 및 화이트리스트 관리 |
5. 단일 계정에서 GuardDuty 활성화
GuardDuty는 리전별로 활성화해야 합니다. 콘솔 또는 CLI 모두 사용할 수 있으며, 30일 무료 체험이 제공됩니다.
콘솔에서 활성화
- AWS 콘솔 → Amazon GuardDuty 검색 → Get Started
- Enable GuardDuty 클릭 — 즉시 활성화됩니다.
- 보호 기능 탭에서 원하는 추가 기능(S3 Protection, EKS Protection, Malware Protection 등)을 선택 활성화합니다.
CLI로 활성화 (자동화 / 멀티 리전)
# 서울 리전 GuardDuty 활성화
aws guardduty create-detector \
  --enable \
  --finding-publishing-frequency FIFTEEN_MINUTES \
  --region ap-northeast-2

# Detector ID 확인
aws guardduty list-detectors --region ap-northeast-2

# S3 Protection 활성화
aws guardduty update-detector \
  --detector-id <DETECTOR_ID> \
  --data-sources S3Logs={Enable=true} \
  --region ap-northeast-2

# Malware Protection 활성화
aws guardduty update-detector \
  --detector-id <DETECTOR_ID> \
  --features '[{"Name":"EBS_MALWARE_PROTECTION","Status":"ENABLED"}]' \
  --region ap-northeast-2
SNS 알림 설정 (탐지 시 이메일 수신)
# 1) SNS 토픽 생성
aws sns create-topic --name guardduty-alerts --region ap-northeast-2

# 2) 이메일 구독 추가
aws sns subscribe \
  --topic-arn arn:aws:sns:ap-northeast-2:<ACCOUNT_ID>:guardduty-alerts \
  --protocol email \
  --notification-endpoint security@example.com

# 3) EventBridge 규칙 — HIGH severity Finding 발생 시 SNS 전송
aws events put-rule \
  --name guardduty-high-severity \
  --event-pattern '{
    "source": ["aws.guardduty"],
    "detail-type": ["GuardDuty Finding"],
    "detail": {"severity": [{"numeric": [">=", 7]}]}
  }' \
  --region ap-northeast-2

aws events put-targets \
  --rule guardduty-high-severity \
  --targets '[{"Id":"sns","Arn":"arn:aws:sns:ap-northeast-2:<ACCOUNT_ID>:guardduty-alerts"}]' \
  --region ap-northeast-2
6. AWS Organizations 환경에서 중앙 집중식 구성
다수의 AWS 계정을 운영하는 경우 계정마다 GuardDuty를 개별 설정하면 관리 부담이 커집니다. AWS Organizations의 위임 관리자(Delegated Administrator) 기능을 사용하면 보안 전담 계정 하나에서 전체 조직의 GuardDuty를 중앙 관리할 수 있습니다.
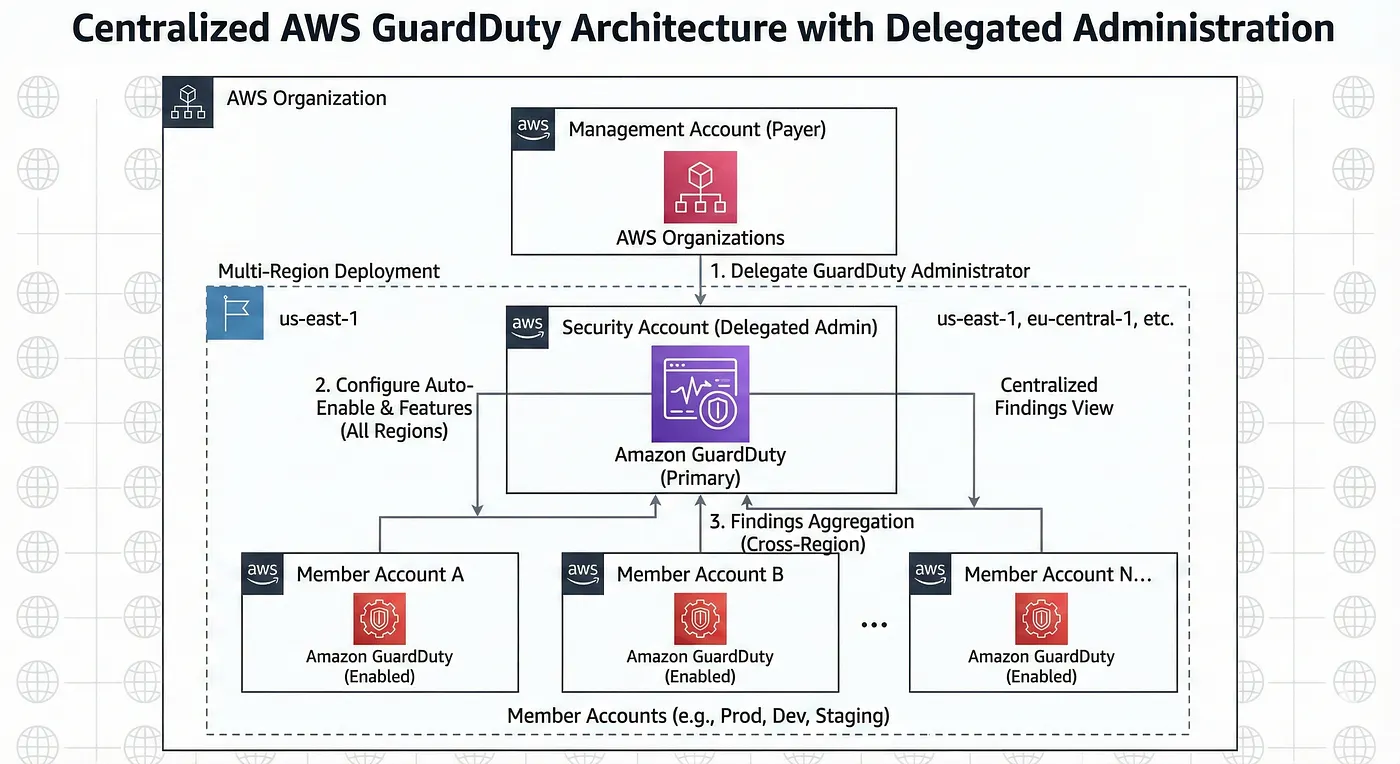
그림 1. Delegated Administrator(Security Account)를 통한 GuardDuty 중앙화 아키텍처.
멤버 계정(Prod, Dev, Staging)의 Findings가 크로스 리전으로 집계됩니다.
아키텍처 흐름
- Management Account에서 Security Account를 GuardDuty 위임 관리자로 지정
- Security Account에서 Auto-Enable 및 보호 기능을 전체 리전에 일괄 설정
- 멤버 계정(Prod, Dev, Staging …)에 GuardDuty가 자동으로 활성화됨
- 크로스 리전 Findings Aggregation으로 모든 계정·리전 결과를 단일 뷰로 확인
위임 관리자 지정 (Management Account에서 실행)
# GuardDuty 서비스에 Organizations 신뢰 활성화
aws organizations enable-aws-service-access \
  --service-principal guardduty.amazonaws.com

# Security Account를 GuardDuty 위임 관리자로 지정
aws guardduty enable-organization-admin-account \
  --admin-account-id <SECURITY_ACCOUNT_ID> \
  --region ap-northeast-2
Auto-Enable 및 보호 기능 설정 (Security Account에서 실행)
# Security Account에서 Detector ID 확인
aws guardduty list-detectors --region ap-northeast-2

# 신규 멤버 계정 자동 활성화 설정
aws guardduty update-organization-configuration \
  --detector-id <DETECTOR_ID> \
  --auto-enable-organization-members ALL \
  --region ap-northeast-2

# 조직 전체에 S3 Protection 자동 적용
aws guardduty update-organization-configuration \
  --detector-id <DETECTOR_ID> \
  --features '[
    {"Name":"S3_DATA_EVENTS","Status":"ENABLED","AdditionalConfiguration":[]},
    {"Name":"EKS_AUDIT_LOGS","Status":"ENABLED","AdditionalConfiguration":[]},
    {"Name":"EBS_MALWARE_PROTECTION","Status":"ENABLED","AdditionalConfiguration":[]},
    {"Name":"RDS_LOGIN_EVENTS","Status":"ENABLED","AdditionalConfiguration":[]},
    {"Name":"LAMBDA_NETWORK_LOGS","Status":"ENABLED","AdditionalConfiguration":[]}
  ]' \
  --region ap-northeast-2
크로스 리전 Findings 집계 활성화
기본적으로 GuardDuty Findings는 리전별로 분리됩니다. Findings Aggregation을 활성화하면 모든 리전의 결과를 기준 리전(Aggregation Region) 하나에서 통합 조회할 수 있습니다.
# 서울 리전을 집계 기준 리전으로 설정 (Security Account에서 실행)
aws guardduty create-finding-aggregation-region \
  --detector-id <DETECTOR_ID> \
  --region ap-northeast-2

# 집계 대상 리전 추가 (예: 버지니아 리전)
aws guardduty update-finding-aggregation-region \
  --detector-id <DETECTOR_ID> \
  --region ap-northeast-2 \
  --linked-regions us-east-1 eu-central-1
기존 멤버 계정 수동 추가 (필요 시)
# 기존에 이미 있던 멤버 계정을 GuardDuty에 연결
aws guardduty create-members \
  --detector-id <DETECTOR_ID> \
  --account-details '[
    {"AccountId":"<MEMBER_ACCOUNT_ID_1>","Email":"prod@example.com"},
    {"AccountId":"<MEMBER_ACCOUNT_ID_2>","Email":"dev@example.com"}
  ]' \
  --region ap-northeast-2
7. Findings 조회 및 자동 대응
콘솔에서 Findings 확인
GuardDuty 콘솔 → Findings 탭에서 심각도 필터, 리소스 유형, Finding 유형별로 검색할 수 있습니다. 개별 Finding을 클릭하면 영향받은 리소스 ARN, 소스 IP, 발생 시간, MITRE ATT&CK 매핑 정보를 확인할 수 있습니다.
Lambda를 이용한 자동 격리 예시
# EventBridge → Lambda → EC2 격리 흐름
# Lambda 함수 핵심 로직 (Python)

import boto3, json

def lambda_handler(event, context):
    detail   = event['detail']
    severity = detail['severity']
    instance_id = (detail.get('resource', {})
                        .get('instanceDetails', {})
                        .get('instanceId'))

    if severity >= 7 and instance_id:
        ec2 = boto3.client('ec2')
        # 격리 전용 Security Group(모든 트래픽 차단)으로 교체
        ec2.modify_instance_attribute(
            InstanceId=instance_id,
            Groups=['sg-ISOLATE_SG_ID']
        )
        print(f"Isolated instance: {instance_id}")
8. 비용 구조
| 분석 데이터 소스 | 과금 기준 |
|---|---|
| CloudTrail 관리 이벤트 | 월 처음 5억 건 무료 (이후 건당 과금) |
| VPC Flow Logs / DNS Logs | 처리된 데이터 GB당 과금 (리전별 차등) |
| S3 Protection (CloudTrail S3 이벤트) | 분석된 이벤트 건당 과금 |
| Malware Protection (EC2/S3) | 스캔된 GB당 과금 |
| EKS / Lambda / RDS Protection | 분석된 이벤트 건당 과금 |
※ 최초 활성화 후 30일간 무료 체험 제공. 콘솔 내 Usage 탭에서 예상 월 비용 확인 가능.
9. 마무리
GuardDuty는 활성화 버튼 하나로 시작할 수 있지만, 제대로 활용하려면 Organizations 위임 관리자 + 크로스 리전 집계 + EventBridge 자동 대응 세 가지를 함께 구성하는 것이 핵심입니다.
- 단일 계정: 콘솔에서 Enable → S3·EKS·Malware Protection 추가 → SNS 알림 설정
- 멀티 계정 (Organizations): Management Account에서 위임 → Security Account에서 Auto-Enable + 크로스 리전 집계
- 자동 대응: EventBridge → Lambda → EC2 격리 / Slack 알림 / Security Hub 연동
ISMS-P, PCI DSS 등 규정 준수 심사에서 GuardDuty 활성화 여부와 Findings 대응 이력은 주요 증적 자료가 됩니다. 활성화만 하고 Findings를 방치하지 말고, 최소 주 1회 검토 주기와 High Severity 자동 알림을 반드시 설정하세요.